
Multiple Assignees
Multiple Assignees lets you assign several people to a single Jira issue, track each contributor's progress, and automate assignment rules — without sub-tasks. One contributor is always marked as the primary assignee, keeping native Jira reports, boards and notifications fully compatible.
What's new
- Primary assignee— designate one accountable owner per issue while keeping co-assignees. Auto-syncs with Jira's native
assigneefield, including for legacy issues. - Refreshed Progress Report — summary KPIs at the top, colour-coded bars, sort by progress, filter chips with Clear filters.
- Streamlined Settings— three clear sections (Defaults, Display & notifications, Automation) instead of a flat list.
- Permission-safe watcher sync — when a user lacks the Manage Watchers permission, the addition is skipped silently rather than failing the whole operation.
Installation
The first time you open the app, you'll need to allow access to your Atlassian Cloud instance. Click Allow access, review the authorization, then click Accept.
Where to find the app
Multiple Assignees exposes two entry points inside Jira:
- Project tab — Multiple Assignees. Open your project and look for the Multiple Assigneestab in the project's top navigation bar (next to Summary, List, Board, Timeline…). This tab gives you access to the Progress Report and the Settingssub-pages. If you don't see the tab, click the + icon at the end of the tab bar (or the More menu in compact layouts) and pin Multiple Assignees — Jira may otherwise collapse it when your project has many apps installed.
- Issue panel. On any issue view, the Multiple Assignees panel appears in the right-hand side panel area. If the panel is collapsed, click the Multiple Assignees app icon in that area to expand it. Once expanded, Jira remembers the choice for you on that issue.
Primary assignee & co-assignees
Every issue managed by Multiple Assignees has one primary assignee — marked with a gold star (★) in the panel — and any number of co-assignees. The primary assignee is automatically synchronised with Jira's native assignee field, so:
- Native Jira reports, dashboards, sprint planning and notifications keep working as expected — they see a single accountable owner per issue.
- The co-assignees still appear in the panel with their own progress, estimate allocation and worklog, and are searchable via JQL.
To change the primary assignee, click the empty star next to any co-assignee's name in the panel. The update is applied instantly and the native assignee field follows automatically.
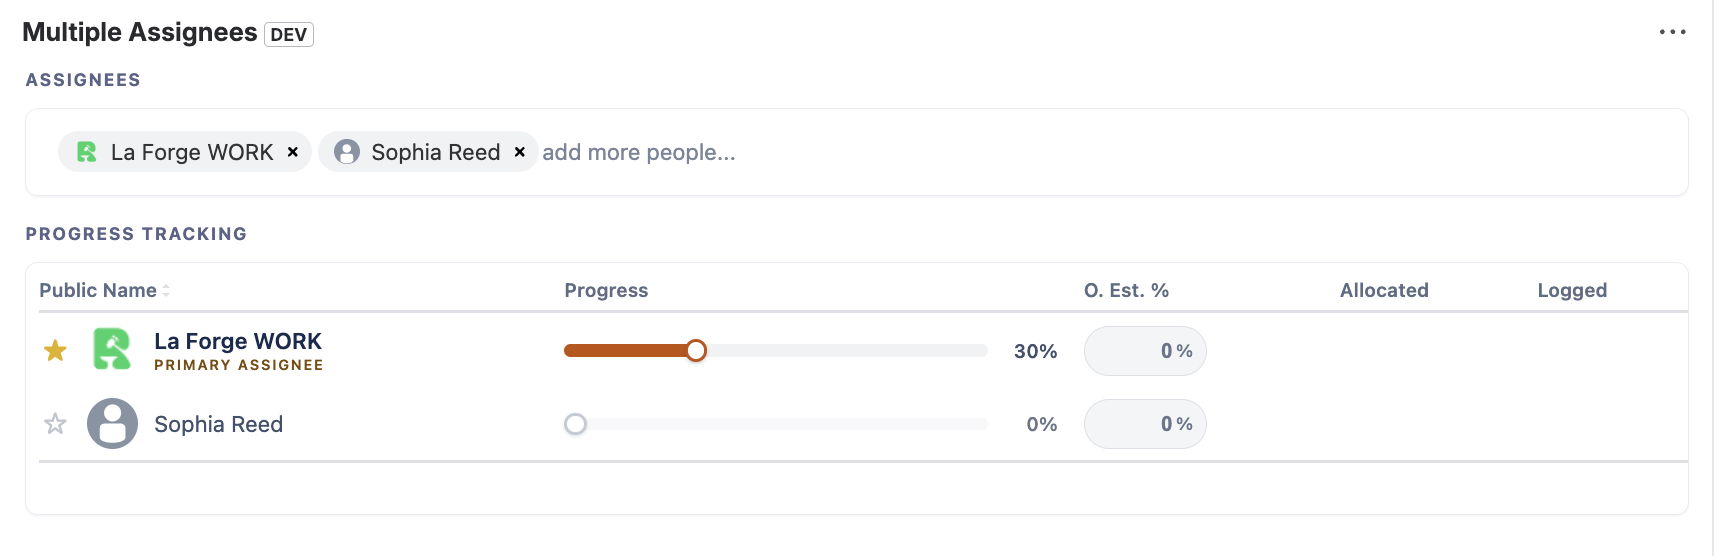
Legacy issues created before this feature was rolled out automatically promote the first contributor as primary the first time the panel is opened — no manual migration required.
Progress report
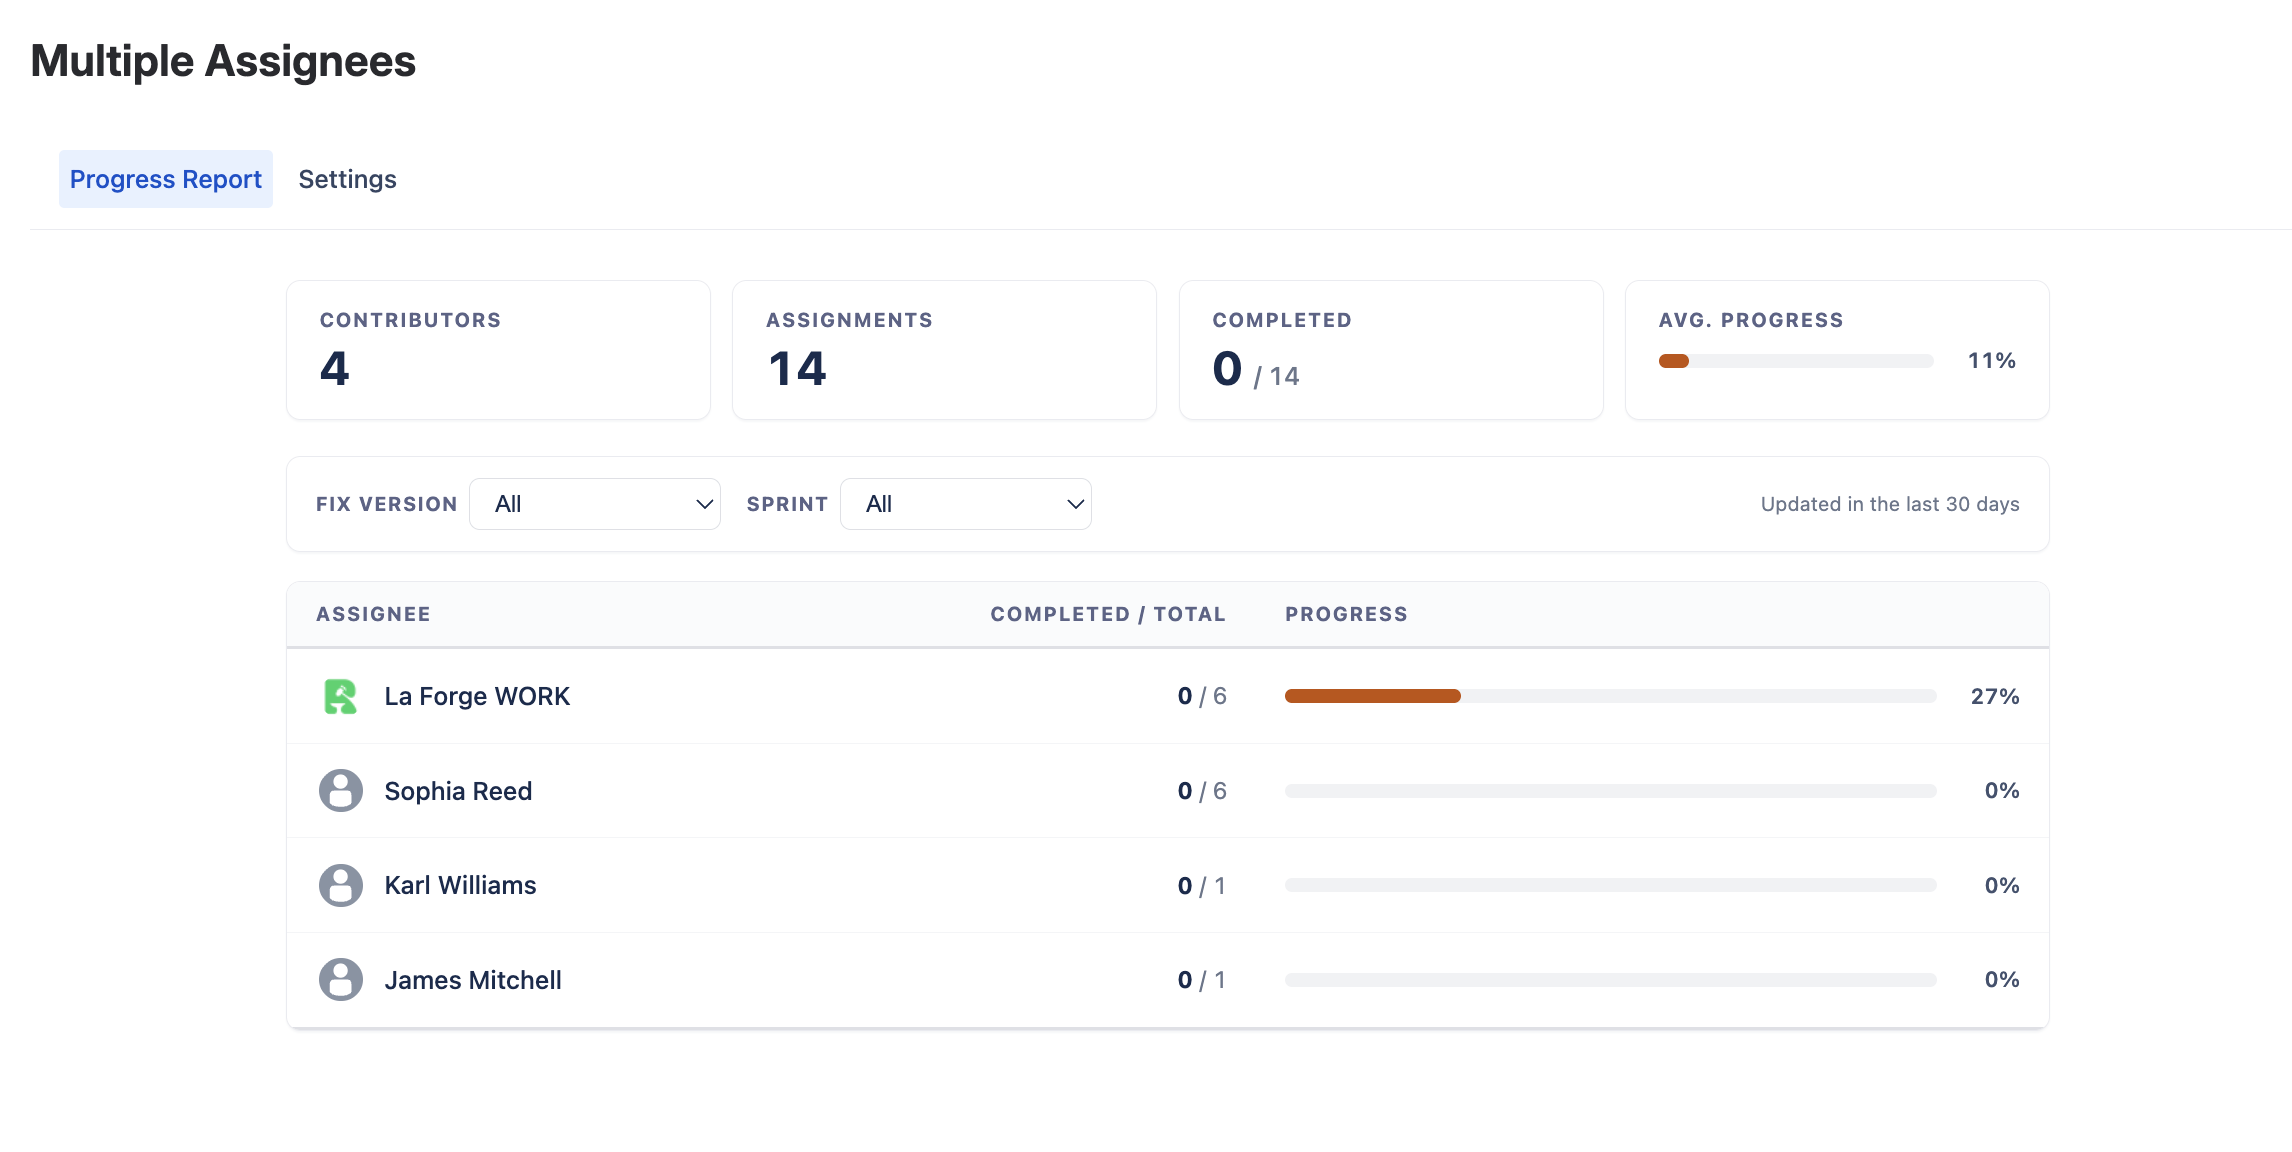
Available from the Multiple Assignees project tab (see Where to find the app above), under the Progress Report sub-page. It aggregates per-contributor activity across all issues updated in the last 30 days. At the top, four summary cards show Contributors, Assignments, Completed and a weighted Average progress. The table below is sorted by progress descending, so top contributors are surfaced first.
Use the filter bar to narrow down by fix version or sprint; the summary updates accordingly. A Clear filters shortcut appears when any filter is active. The progress bar is colour-coded — red below 40%, amber up to 80%, green above — for at-a-glance health.
Project settings
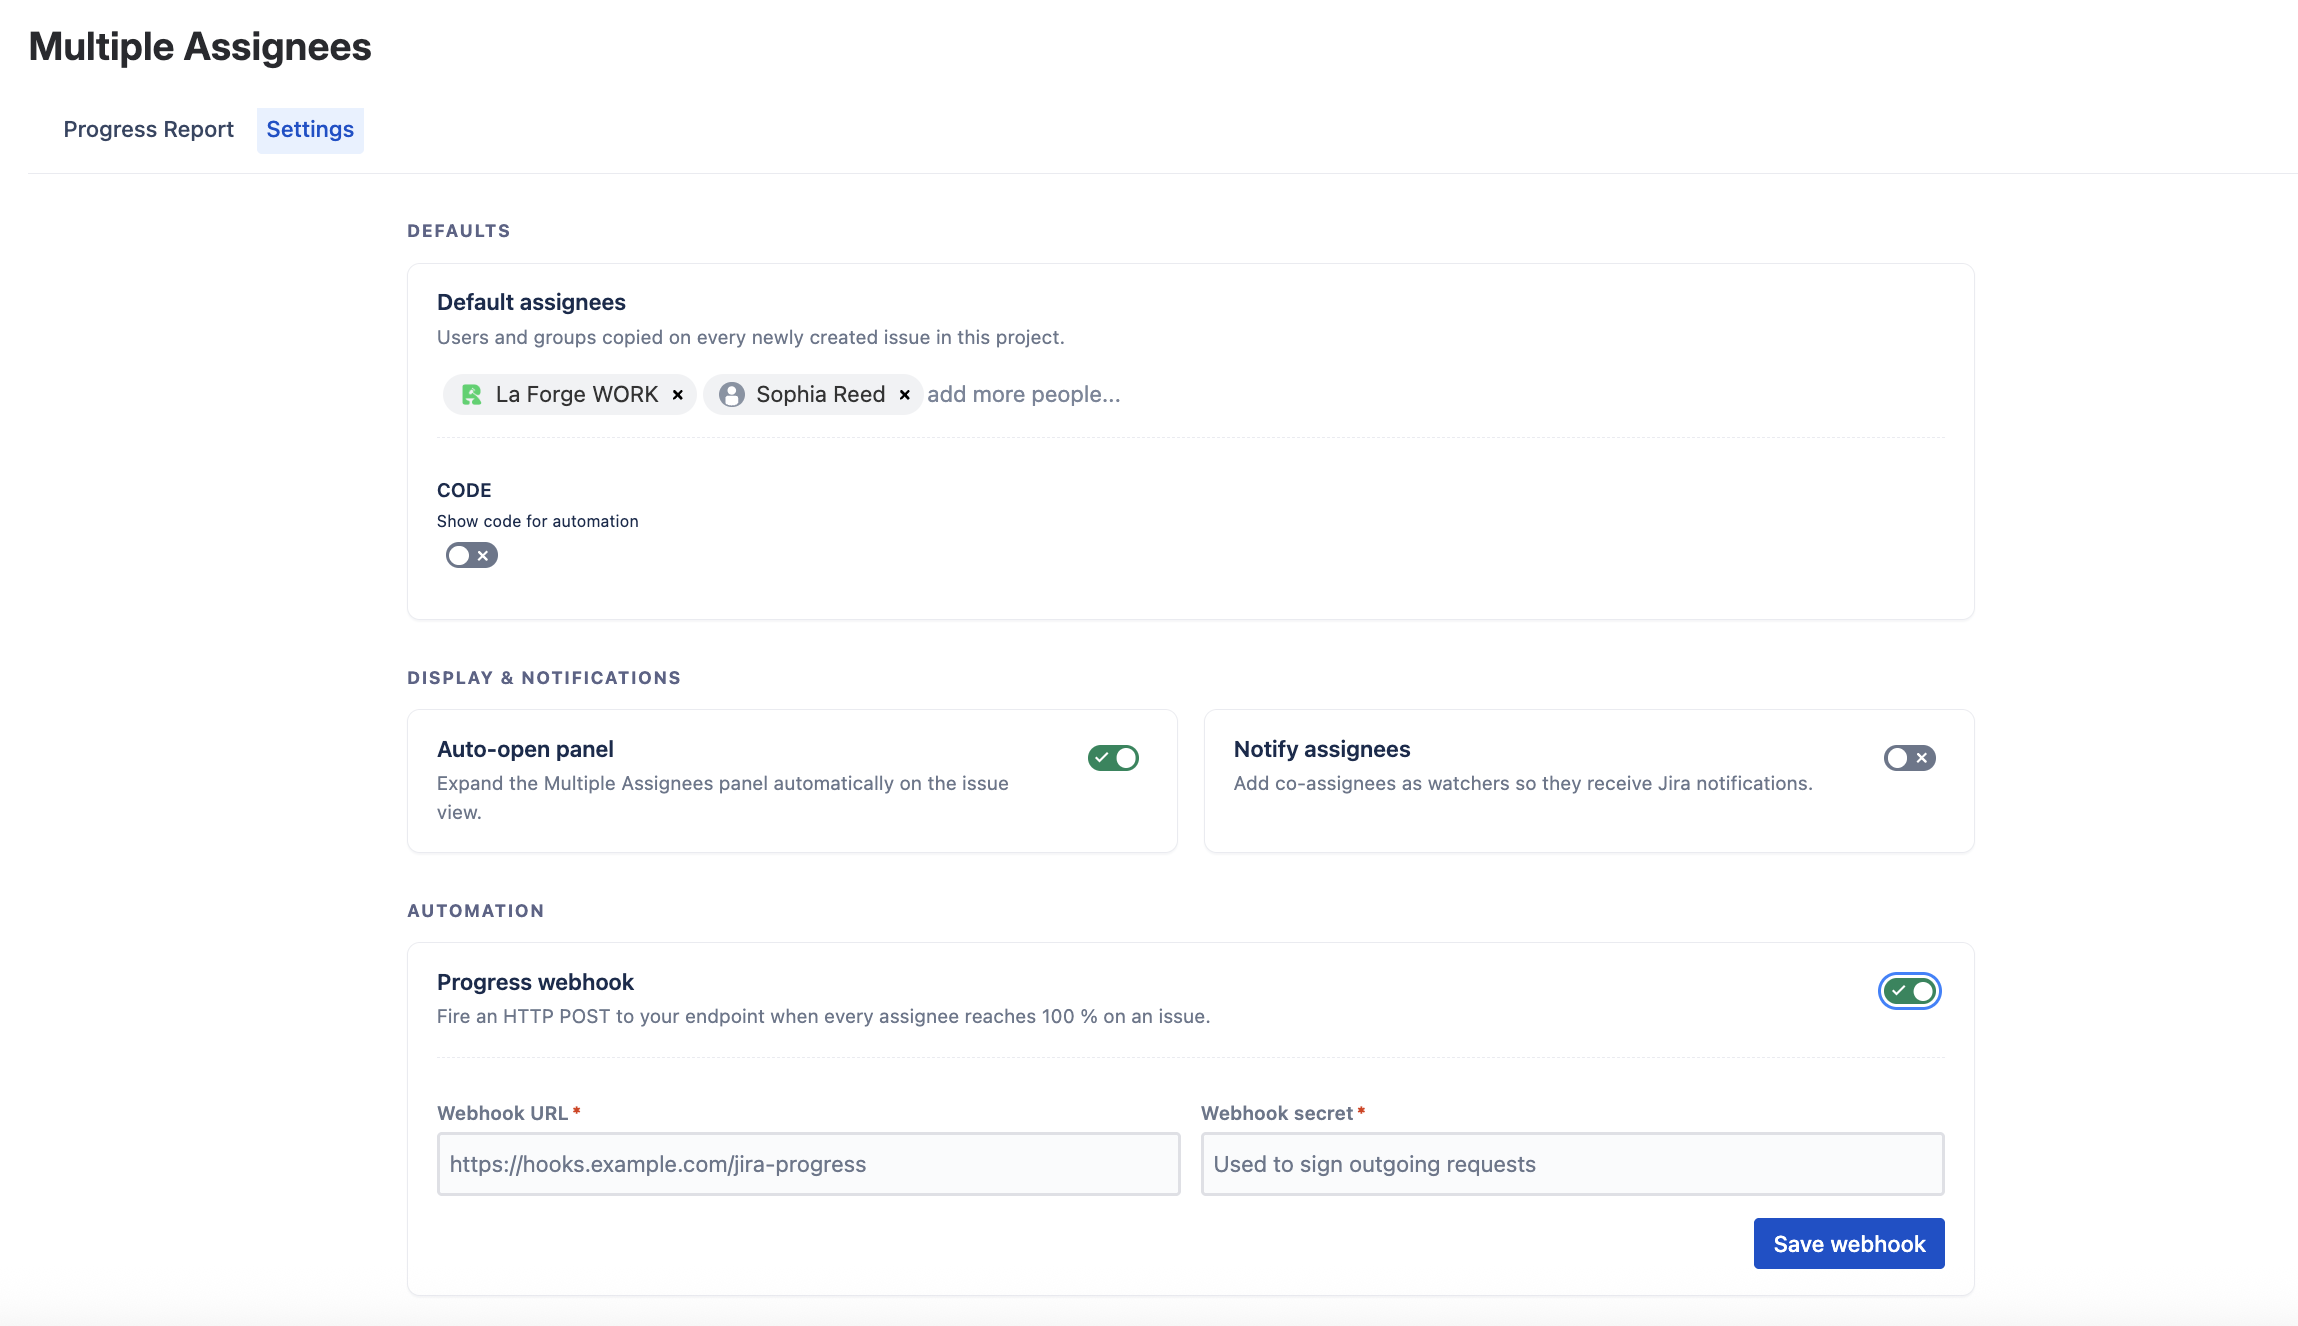
Available from the Multiple Assignees project tab (see Where to find the app above), under the Settings sub-page. It is organised into three sections:
- Defaults — choose a list of default assignees that are automatically applied to every newly created issue. The first default in the list becomes the primary assignee.
- Display & notifications — toggle Auto-open panel (expands the panel by default on the issue view) and Notify assignees (adds co-assignees as watchers and posts a short notification comment).
- Automation — enable the Progress completion trigger. When every assignee on an issue reaches 100% completion, the app posts a marker comment on the issue that you can catch with a Jira Automation rule — see Progress completion automation below.
Progress completion automation
When the Progress completion trigger toggle is enabled in Settings → Automation, the app posts a comment on the issue the moment every assignee reaches 100% completion. The comment always contains the marker:
[multiple-assignees] progress-completeBecause Multiple Assignees is a Runs on Atlassian app, it never sends your data outside of Jira. Instead of a built-in outbound webhook, you pair this marker comment with a Jira Automation rule — which gives you strictly more power: web requests, Slack or email notifications, transitions, and any other Automation action.
Set up the Automation rule
- Go to Project settings → Automation and create a new rule.
- Select the trigger When: Comment added.
- Add the condition Comment contains (or an Advanced compare condition on
{{comment.body}}) matching[multiple-assignees] progress-complete. - Add any action you need — for example Send web request to reach your own endpoint (put your secret in a request header), Transition issue to move it to Done, or Send Slack message.
Migrating from the legacy progress webhook
Earlier versions offered a built-in Progress webhook (URL + secret) that the app called directly. This outbound call has been removed as part of our Runs on Atlassian certification — the app no longer egresses any data. If you relied on it, recreate the exact same behaviour with the rule above: trigger on the marker comment, then use Send web request with your previous URL and your secret set as a custom header (for example X-Automation-Webhook-Token). Your endpoint will receive the request exactly as before, except it is now sent by Jira Automation under your control.
Automation rules to set default assignees
For more complex assignment rules with conditions, use Jira Automation rules. This configuration overrides the default priority assignment set in the Multiple Assignees settings tab. See the official Atlassian guide: Create and edit Jira automation rules.
To set a list of assignees when a new issue is created:
- Create a new rule.
- Select the event: When: Issue is created.
- Add a condition (optional).
- Add a New Action, scroll down to Advanced and select Set Entity Property.
- Set
Entity typetoissue, andProperty Keytoep-assignees. - The property value must be in JSON format:
{
  "assignees": [],
  "assigneesids": [],
  "selection": [
    {
      "id": "",
      "name": "",
      "publicName": "",
      "avatarUrl": "",
      "primary": true
    }
  ]
}
Field reference:
assignees— list of user or group public namesassigneesids— list of user or group public account IDsselection— the list of user/group objects:id(account id),name,publicName,avatarUrl(users only),primary(optional boolean — exactly one entry should be flaggedtrueto designate the primary assignee).
If no entry is flagged primary, the first one in selection is promoted automatically and synchronised with Jira's native assignee field on the next panel open.
You can use the verbose toggle in the Multiple Assignees panel to help build the JSON, and validate it with json.parser.online.fr. Then paste the result into the property value.
Visibility in the issue view
Multiple Assignees appears on the main panel of the issue view. By default, users can expand it by clicking the app icon.
New issues
Enable the Auto-open panel toggle under Settings → Display & notifications. From that moment on, every newly created issue in the project opens with the panel already expanded — no default assignees or extra configuration required. The toggle is project-scoped, so enable it in each project where you want the behavior.
Existing issues
Issues created before the toggle was enabled keep their previous collapsed state — the auto-open mechanism is not retroactive. Each user simply needs to expand the panel manually once by clicking the Multiple Assignees app icon in the issue's right-hand side panel area (see Where to find the app above); Jira remembers that choice for that user afterwards.
Each assignee is also added as a watcher of the issue and will receive update notifications. If the user performing the change does not have the Manage Watchers project permission, Multiple Assignees skips the watcher addition silently — it never bypasses Jira permission checks.
Display the field on board cards
You can display the Multiple Assignees custom field directly on your Jira board cards. The card text follows the panel data live: the gold star marks the primary assignee, and each contributor gets a compact progress bar reflecting their current % completion. Hovering the card shows the full value when it is truncated.
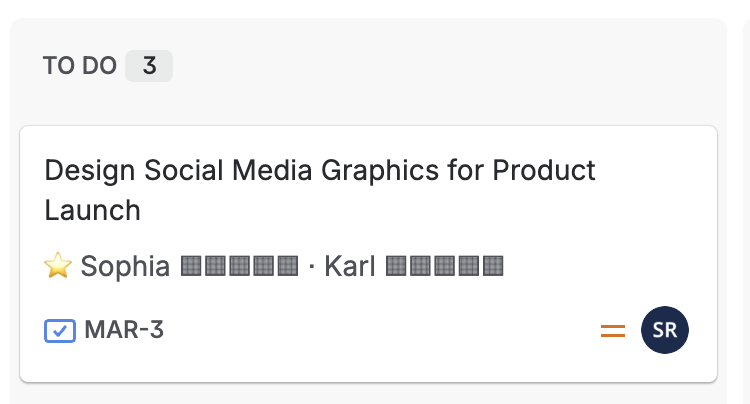
This works reliably on company-managed projects. On team-managedprojects, custom fields on board cards are only partially supported by Jira and may not appear depending on the project's age and settings — this is a Jira platform limitation, not specific to Multiple Assignees. If the field is missing on a team-managed board, first make sure it is added to the issue layout via Project settings → Issue types → [type] → Context fields, then look for a Card section under Board configuration.
Step 1 — Add the custom field to project screens
- Navigate to Project settings → Screens.
- Identify the screen schemes associated with your issue types.
- Edit each screen and add the Multiple Assignees field. You need permission to modify screen configurations.
Step 2 — Customize board cards
- Open your board (Scrum or Kanban).
- Click the ••• icon at the top right and select Board settings.
- In the sidebar, click Card layout.
- Under the relevant section (Backlog or Active sprints), click Add field, then select Multiple Assignees.
Time & estimate allocation
The issue view panel includes enhanced columns to help manage workload distribution:
- Progress — a draggable slider to report task completion per assignee (0–100%). The bar is colour-coded (orange below 40%, amber up to 80%, green above) for instant readability.
- O. Est. %— assign a percentage of the issue's original estimate to each assignee. The picker is capped automatically so the total cannot exceed 100%.
- Allocated — calculated time (in
w d h m) allocated to each assignee based on their percentage. - Logged — total time logged by each assignee on the issue, in
w d h m. Coloured red when it exceeds the allocated budget — useful to spot over-assignment at a glance.
Tracking assigned issues with JQL
Use a JQL filter based on multipleAssignees or multipleAssigneesIds:
Static approach:
multipleAssignees = "your public name"
// Example
multipleAssignees = "Joe Smith"
Dynamic approach:
multipleAssigneesIds = currentUser()Using a Kanban board
Create a dedicated Kanban board based on that filter to track your own assigned issues. To track other members' issues, you can also create quick filters. See: Create a board based on filters and Configure quick filters.
Using Jira Service Management
Create a custom queue based on that JQL filter.
Tracking issues by group
This requires a bit of manual configuration — we hope to support dynamic JQL returning the list of issues in the future, which is why we recommend using Automation with explicit user lists when possible. If you still need to track by group:
- Create one custom queue per group with the JQL:
multipleAssignees = "GROUP_NAME". - Name the queue Assigned to GROUP_NAME.
- Each user can then star their queue (favorite) to see it at the top of the list.
Notifications and watchers
The app uses Jira's built-in watcher notification system. Each selected contributor is automatically added as a watcher when the issue is created. To make sure these users receive email notifications, your project notification scheme must include All Watchers under the Issue Created event.
Configure this in Project settings → Notifications. See Atlassian's official guide: Configuring email notifications for Jira Cloud.
Manage Watchers permission
Adding co-assignees as watchers requires the Manage Watchers project permission for the user performing the change. When that permission is missing, Multiple Assignees logs a notice and skips the watcher addition silently — the rest of the assignment still goes through, but the co-assignees will not be added as watchers and will not receive the related notifications.
If you see lines like Skipping watcher … — current user lacks "Manage Watchers" in the Forge logs, grant the Manage Watchers permission to the relevant role in Project settings → Permissions. We never escalate to app-level privileges from user-driven actions — this is a Marketplace security requirement.
Managing original estimated %
When using original-estimate percentages (e.g. splitting 25%, 50%, etc. between assignees), reset an assignee's estimate to zero before removing them. If an assignee with an existing estimate is removed directly, the remaining assignees' progress may be blocked or miscalculated.
Project-level default assignees permissions
To edit default assignees at the project level, the user must have the Administer projects permission for that project. Without it, project default assignees cannot be updated.
Support
Got a question, bug report or feature idea? Reach us through the Support page.